


Creamy Russian Salad with Homemade Mayonnaise: A Timeless Classic for Every Occasion
Article published on:
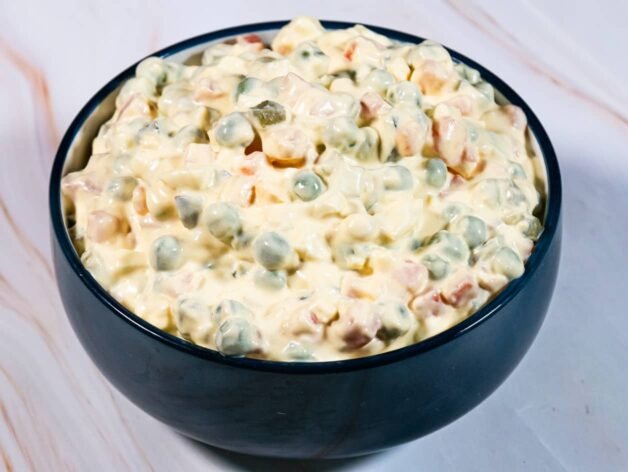
A creamy Classic Russian Salad with tender vegetables, tangy pickles, and rich homemade mayonnaise—perfect for festive gatherings or everyday meals.
This Classic Russian Salad, also known as Salade Russe or Olivier Salad, is a creamy and colorful dish loved worldwide. Packed with tender potatoes, sweet carrots, green peas, tangy pickles, and rich homemade mayonnaise, it’s a timeless recipe perfect for festive gatherings, family dinners, or as a side dish for grilled meats.
The Rich History Behind This Iconic Russian Salad Recipe
Originating in Russia in the 19th century, this salad was first created by Lucien Olivier, a celebrated chef at Moscow’s prestigious Hermitage restaurant. Originally made with luxurious ingredients like caviar, game meats, and crayfish, the salad has since evolved into a more approachable yet equally delicious dish. Today, Russian Salad is enjoyed across the globe, appearing on holiday tables and at celebratory feasts from Spain to India and everywhere in between.
Key Ingredients for the Perfect Russian Salad: Quality Matters
The magic of Russian Salad lies in the quality of its ingredients. Each component contributes to the overall balance of flavors, and choosing high-quality produce ensures exceptional results.
- Perfectly Cooked Potatoes (diced) – The starchy base that holds the creamy dressing beautifully.
- Sweet Carrots (diced) – Add a natural sweetness and vibrant color to the dish.
- Fresh Green Peas – Bursting with freshness, peas add a pop of color and sweetness.
- Rich Hard-Boiled Eggs (chopped) – Enhance the salad’s texture and add protein-rich richness.
- High-quality Pickles (diced) – The heart of the salad’s tangy kick. Crisp and tangy pickles balance the richness of the dressing and bring everything together.
- Silky Homemade Mayonnaise – Fresh, homemade mayonnaise is the soul of this salad.
- Smooth Sour Cream – Lightens the dressing with a slight tang.
- Flavorful Mustard – A touch of sharpness to elevate the dressing.
- Bright Lemon Juice – A splash of citrus to balance the creaminess.
- Essential Salt and Pepper (to taste) – For the perfect finishing touch.
The Importance of Pickles
The quality of pickles is often overlooked, but they are one of the defining ingredients of this salad. Poor-quality pickles can overpower or flatten the overall flavor, while high-quality ones provide a perfect tangy kick and refreshing crunch. Look for pickles that are naturally fermented or made without artificial sweeteners. They should be firm, crisp, and have a balanced sour flavor.
Step-by-Step Preparation for Classic Russian Salad
Creating this Classic Russian Salad is all about precision, patience, and the quality of your ingredients. Follow these easy steps to achieve a creamy, flavorful salad perfect for any occasion.
Step 1: Cook the Vegetables
Peel and dice 1¼ cups (140–150 g) of carrots and 1¼ cups (140–150 g) of potatoes into small, even cubes. Cook them separately in salted boiling water until tender but firm enough to hold their shape. Briefly blanch 1¾ cups (200–210 g) of green peas in boiling water, then drain and allow all the vegetables to cool completely before proceeding.
Step 2: Prepare the Eggs and Pickles
Hard boil 4 large eggs, let them cool, peel, and chop them into small pieces. Dice 1½ cups (250 g) of pickles into small, even cubes to ensure their tangy flavor is evenly distributed throughout the salad.
Step 3: Combine the Salad Base
In a large mixing bowl, gently combine the cooled carrots, potatoes, green peas, chopped eggs, and pickles. Stir carefully to maintain the shape of the diced vegetables and prevent them from turning mushy.
Step 4: Prepare the Dressing
In a separate bowl, whisk together 1¼ cups (300 ml) of homemade mayonnaise, ⅔ cup (150 ml) of sour cream, 1 teaspoon (5 ml) of mustard, and a few drops of lemon juice. Season the dressing with salt and pepper to taste. Mix until smooth and creamy.
Step 5: Mix Everything Together
Pour the dressing over the combined vegetables and eggs. Using a spatula or large spoon, gently fold the dressing into the salad until every ingredient is evenly coated. Take care not to crush the vegetables during mixing. Taste and adjust the seasoning if necessary.
Step 6: Chill Before Serving
Transfer the salad to an airtight container or serving dish. Cover and refrigerate for at least 1 hour to allow the flavors to meld together and the salad to chill properly.
Important Notes for Cooking Instructions:
- Room Temperature Ingredients: Ensure mayonnaise and other dressing ingredients are at room temperature for a smooth dressing texture.
- Don’t Overcook Vegetables: Vegetables should be tender but still hold their shape when mixed.
- Quality Pickles: Use crisp, tangy pickles for the best flavor balance.
- Chill Before Serving: Chilling is essential for the flavors to meld properly.
This step-by-step guide ensures that every bite of your Classic Russian Salad delivers a perfect balance of creamy dressing, tender vegetables, and tangy pickles. Enjoy your dish!
Tasty Variations to Customize Your Russian Salad Recipe
- Savory Ham Addition: Add diced, cooked ham for an extra layer of flavor and protein.
- Seafood Twist: Stir in cooked shrimp or crab meat for a luxurious version.
- Fruity Touch: Add a diced apple for a hint of sweetness and crunch.
- Spicy Kick: Mix in a teaspoon of sriracha or chili paste for a bold, spicy note.
- Vegetarian Delight: Skip the eggs and add canned corn for an extra pop of flavor.
These variations let you adapt the salad to suit different occasions, tastes, and dietary preferences.
Best Practices for Storing Russian Salad
Refrigerate the Russian Salad in an airtight container for up to 3 days. Avoid freezing, as mayonnaise-based dressings don’t freeze well and tend to separate when thawed. Before serving leftovers, gently stir to redistribute the dressing evenly.
How to Serve Russian Salad for Maximum Impact
Russian Salad is a versatile dish that complements a variety of main courses. Serve it as a chilled side dish at summer barbecues, pair it with grilled chicken or steak, or enjoy it as an appetizer with crusty bread. For an elegant presentation, garnish the salad with fresh parsley or slices of hard-boiled egg.
The Secret to an Unforgettable Russian Salad
The beauty of Classic Russian Salad lies in the balance of flavors and the harmony of fresh, high-quality ingredients. From the crisp tang of pickles to the richness of homemade mayonnaise, every bite is a celebration of simplicity and attention to detail.
Whether it’s a centerpiece on a holiday table, a staple at a family dinner, or a contribution to a potluck gathering, this salad brings people together with every creamy, flavorful spoonful.
What’s your favorite twist on Russian Salad? Share your ideas in the comments below!
Ingredients
Servings8 servings
- 1¼ cups (150 g) potatoes, diced into small cubes
- 1¼ cups (150 g) carrots, diced into small cubes
- 1¾ cups (200 g) green peas (fresh or frozen)
- 4 large hard-boiled eggs chopped
- 1½ cups (250 g) pickles, diced into small pieces
- 1¼ cups (300 ml) homemade mayonnaise
- ¾ cup (150 ml) sour cream
- 1 tsp (5 ml) mustard (Dijon or regular)
- A few drops of lemon juice
- Salt and pepper to taste
What will you need?
- Knife
- Airtight Container
Have you cooked this?
Mark as cooked!
2 users marked recipe as cooked
Prep time20 minutes
Cook time20 minutes
Cook time1 hour
Instructions
- Dice the carrots and potatoes into small cubes. Cook them separately in salted boiling water until tender. Blanch the green peas, then drain and cool all vegetables.
- Hard boil the eggs, peel, and chop them. Dice the pickles into small cubes.
- In a large bowl, combine the cooled carrots, potatoes, peas, eggs, and pickles. Mix gently.
- Whisk together mayonnaise, sour cream, mustard, a few drops of lemon juice, salt, and pepper.
- Pour the dressing over the vegetables and gently fold until evenly coated. Adjust seasoning if needed.
- Refrigerate the salad for at least an hour to let the flavors meld.
Our notes
Don’t Overcook Vegetables: Keep them firm to avoid mushiness.
Use Quality Pickles: Crisp and tangy pickles make a difference.
Chill Before Serving: Allows flavors to meld perfectly.
Mix Gently: Prevents vegetables from breaking apart.
One Comment
- We call it French salad, but I only make this one like this. It's the best!Log in to reply